 argonptg
 back
back How (Not) to Jailbreak Your Switch
04/03/2025
Well, to start off, I need to explain this somewhat strange title…
This tutorial was not made to be followed, but rather as a way for me to get used to writing these posts, build the habit, and fill up my page. If you really want to jailbreak your Switch, I highly recommend following the guides on switch.hacks.guide and r/switchpirates, they are always the most up-to-date.
Now, let’s get started!
Serial Number
First, we need to find out if your Switch is patched or not. The reason is that the discovered exploit (fuseé-gelee) is available only on Switch v1, from around 2017 to 2018, so if you have a Lite or OLED, I’m sorry, but you’ll need a modchip, which is beyond my capabilities.
To find the serial number, you can look:
- On the Switch’s box;
- Under the Switch;
- In the settings
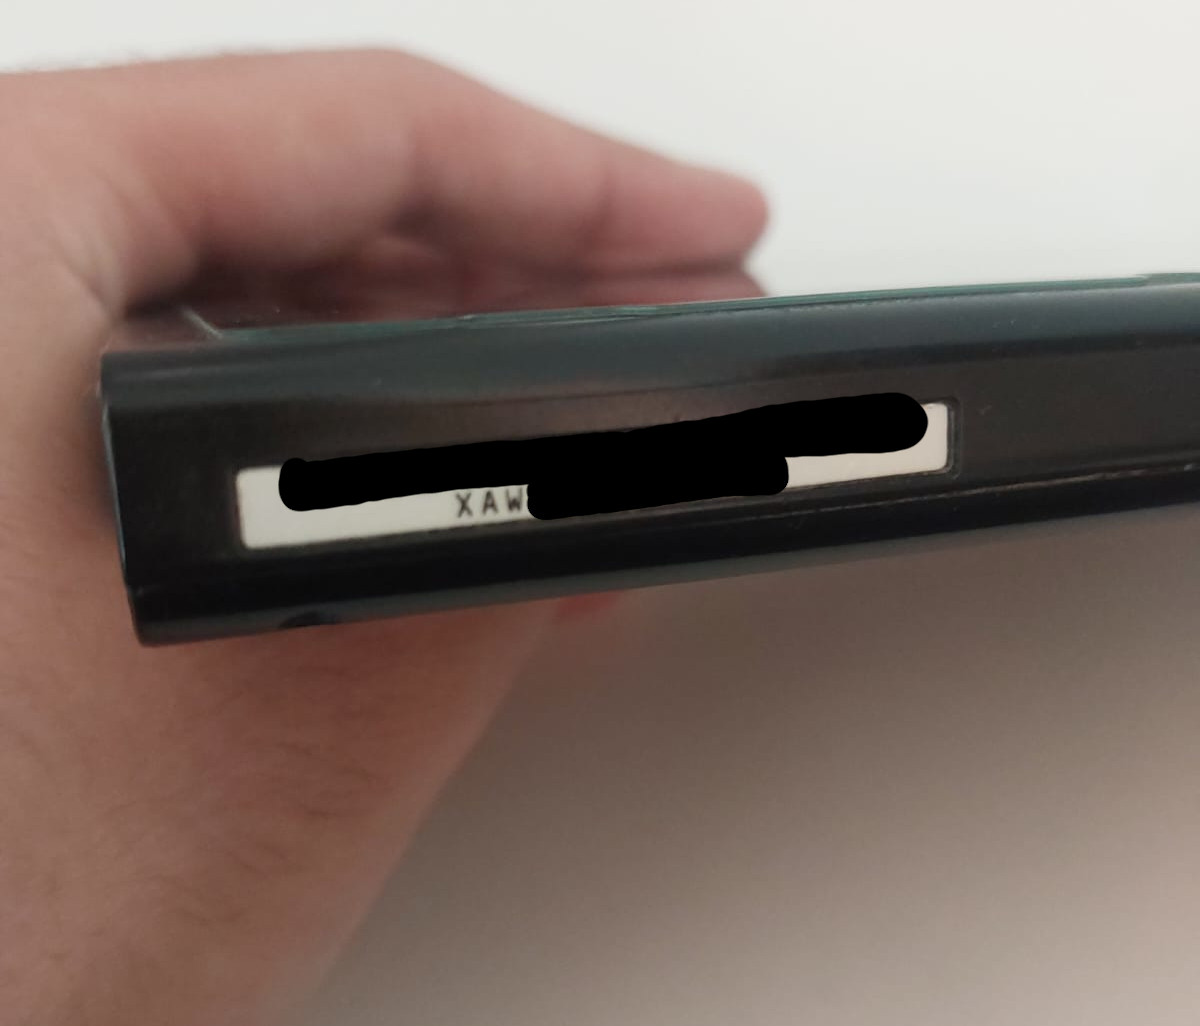
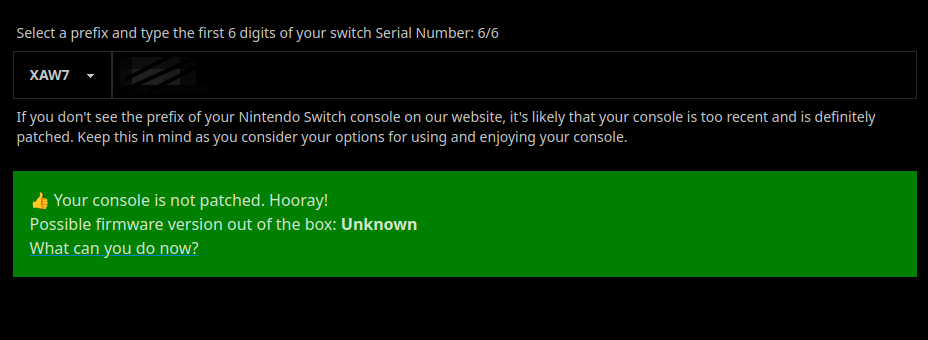
After getting the serial number, type the first 6 digits on is my switch patched, and you’ll find out if it’s patched or not.
Before starting the jailbreak, it’s recommended to install a game for “title takeover,” a function of Atmosphère that allows homebrew to use more resources than those available via the album. It doesn’t need to be something too heavy, something like Fallout Shelter or even YouTube will do.
RCM and Payload
RCM (short for Recovery Mode) is a pre-boot mode in Tegra CPUs, think of it like the BIOS/UEFI of the Switch, where you make changes and run arbitrary code.
The best way to enter RCM is by buying a jig, although it’s possible to enter using a paperclip (although it’s not ideal). It’s very cheap and could save you a huge headache later.
Instructions:
- Power off the Switch and insert the jig into the right rail of the Switch
- While holding the
Vol +button, press thePowerbutton and keep holdingVol +- If nothing appears on the screen, congratulations! You’ve entered RCM!
- Once in RCM, remove the jig from the Switch
Now that (I hope) you’ve entered RCM, it’s time to inject the Payload. But first, let’s prepare the SD card.
You will need:
- The files from Hekate
- A payload injector, like TegraRcmGUI
- A USB-A to USB-C cable (or USB-C to USB-C if your PC has those ports)
- An SD card with more than 32GB
Instructions:
- Format the SD card to FAT32
- Extract the
hekate_ctcaer_X.X.X.zipand copy thebootloaderfolder to the SD card - Insert the SD card into the Switch and install and open TegraRcmGUI
- Click on the
Settingstab, then pressInstall Driverand follow the instructions - Connect the Switch to the RCM via USB
- Click on the
Payloadtab in TegraRcmGUI - Press the button next to
Inject Payloadand open thehekate_ctcaer_X.X.X.bin - Click
Inject Payload- If everything went well, your Switch’s screen should be asking for the time
Backups
Once, when I was getting my new glasses, the lady asked if I had another pair, saying “One pair of glasses is no pair of glasses.” The same can be said if you don’t have backups, both for general data and important things (like the NAND of the Switch).
NAND Backup:
- Since you’re already in RCM, go to
Tools>Backup eMMC - Click on
eMMC BOOT0 & BOOT1- This will take a few seconds if it’s not instantaneous
- Click
Closeand theneMMC RAW GPP- This one will take quite a while, in my case it took over 10 minutes
- Click
Close>Home - Go to
Tools>USB Tools>SD Cardand connect your Switch - Copy the
backupfolder and keep it like it’s your life - After, you can delete the
backupfolder from the SD card and eject the device. Then return toHome
Key Backup:
- Search for “Lockpick_RCM 1.9.13 (FW 19) Zoria 1.9.13 (FW 19)” on Google, click the GBATemp link, and download the file
- Extract and, using the payload injector, inject the
Lockpick_RCM_X_X_XX_Descots-Zoria.bin - Using the
Vol +,Vol -, andPowerbuttons, navigate and selectDump from SysNAND - Once done, press the
Powerbutton to return - Scroll down to
Power Offand select it - Returning to Hekate, go to
Tools>USB Tools>SD Cardand connect your Switch - Copy the
prod.keysandtitle.keysfiles from theswitchfolder and keep them too
Setting Up CFW (Now the Fun Part)
A CFW is an environment where you can run arbitrary code, but it’s never permanently installed and runs independently of the system, with Atmosphère being the most used CFW (and the one we’ll use).
Ah, we also need to decide which system the CFW will run on, whether it will be on emuMMC or sysMMC. For simplicity (and security), we will install it on emuMMC. You should only use sysMMC if:
- Your Switch is already banned
- You are EXTREMELY cautious
Otherwise, don’t even think about it, it’s not worth it.
Now that we’ve decided everything, let’s move on to the fun part >:3. A small warning, you’ll need to format the SD card again, so make sure to back it up first.
Instructions:
- Go to
Tools>Partition SD Card - Set
emuMMC (RAW)to29 FULL- If it’s an OLED, set it to
58 FULL
- If it’s an OLED, set it to
- Click
Next Stepand thenStart - In the initial menu, click
emuMMC>Create emuMMC>SD Partition>Part 1and wait - Once done, go to
Tools>USB Tools>SD Cardand plug the Switch into the PC - Copy the files back

Finally, with the Switch still connected, let’s add some preventions (:wink:) to the emuMMC to prevent your Switch from bricking
On your PC, create 3 files with the following names:
emummc.txt(/atmosphere/hosts/)exosphere.ini(Root)hekate_ipl.ini(/bootloader)
Write the following code in each file
emummc.txt
# Block Nintendo Servers
127.0.0.1 *nintendo.*
127.0.0.1 *nintendo-europe.*
127.0.0.1 *nintendoswitch.*
95.216.149.205 *conntest.nintendowifi.net
95.216.149.205 *ctest.cdn.nintendo.net
exosphere.ini
[exosphere]
debugmode=1
debugmode_user=0
disable_user_exception_handlers=0
enable_user_pmu_access=0
blank_prodinfo_sysmmc=0
blank_prodinfo_emummc=1
allow_writing_to_cal_sysmmc=0
log_port=0
log_baud_rate=115200
log_inverted=0
hekate_ipl.ini
[config]
autoboot=0
autoboot_list=0
bootwait=3
backlight=100
autohosoff=0
autonogc=1
updater2p=1
bootprotect=0

[Atmosphere CFW]
fss0=atmosphere/package3
emummcforce=1
cal0blank=1
kip1patch=nosigchk
icon=bootloader/res/icon_payload.bmp

[Stock SysNAND]
fss0=atmosphere/package3
stock=1
emummc_force_disable=1
icon=bootloader/res/icon_switch.bmp
Starting CFW
We’ve finally reached the end of the tutorial, now comes the easiest part (so much so that it will be repeated many times). Unlike other CFWs, the Switch CFW is volatile. This means it will work until you turn off the console.
To start, it’s very simple:
- In the initial menu, click on
More Configs - Click on
Atmosphere CFW
Congratulations! You’ve jailbroken your Switch! Just make sure it’s actually running by going to Settings > System and checking if the system version includes AMS (e.g., 19.0.0|AMS 1.8.0|E).
And that’s the end of this tutorial, as I mentioned at the beginning, I hope you enjoyed it and that you didn’t follow this guide.
Credits:
- switch.hacks.guide - The best guide for jailbreaking
- Switch Pirates - The second-best guide for jailbreaking
- Google - The worst search engine in the world